MAP uses a multitenancy architecture, meaning that MAP customers are using the same Intel EMA server.
Even though customers are using the same Intel EMA server, they are not aware of each other, and each customer's data is kept completely separate.
Each customer is given access to a tenant created specifically for them. Each tenant's data is isolated and remains invisible to other customers.
To understand multitenancy, think of how banking works. Multiple people can store their money in the same bank, but their assets are completely separate, even though they are kept in the same place. Customers of the bank do not interact with each other, do not have access to other customers' money, and are not even aware of each other.
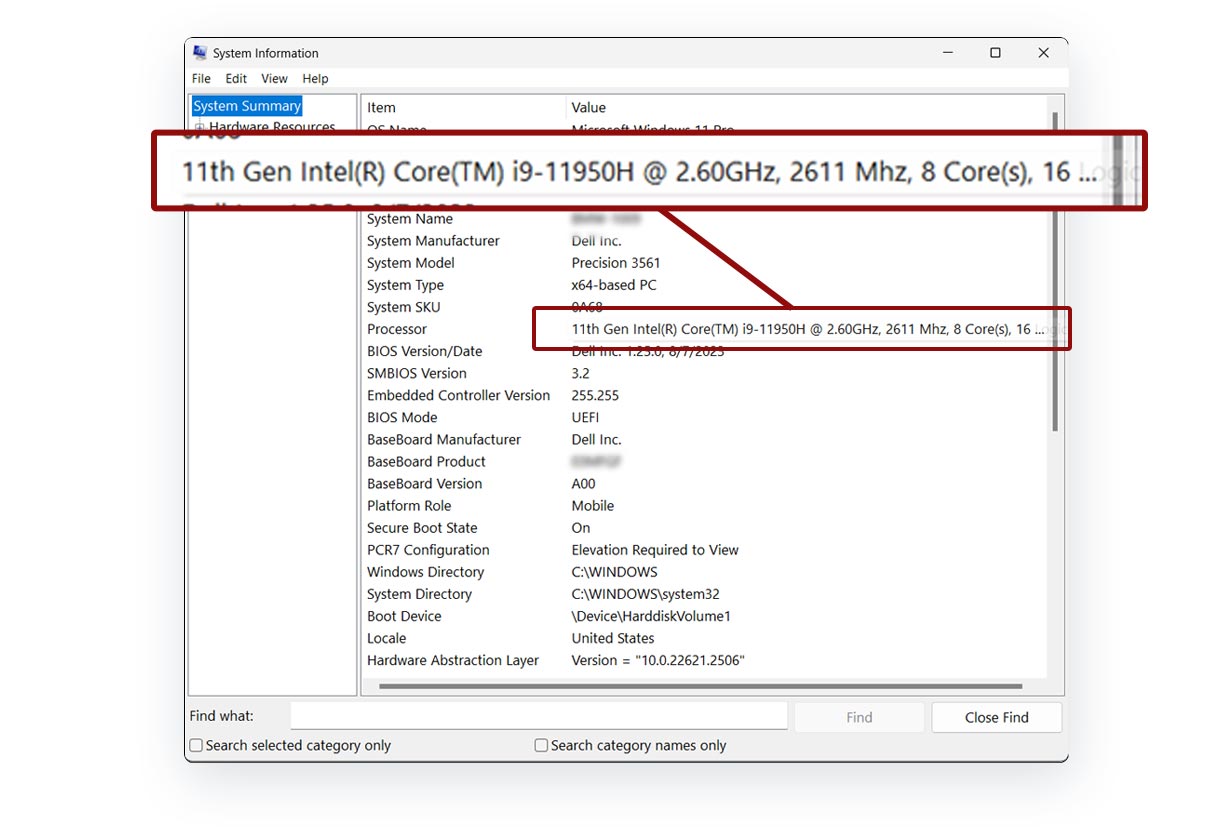
You can identify the generation of your processor if it is an Intel® Core™ processor.
The generation is indicated by the first number after i9, i7, i5, or i3. For example, in the Intel® Core™ i9-11950K processor, the number 11 indicates it is from the 11th generation.
To view your system information, including details about the processor, use “System Information.”
vPro PC Identification: The Intel branding sticker on the PC should contain “vPro.”
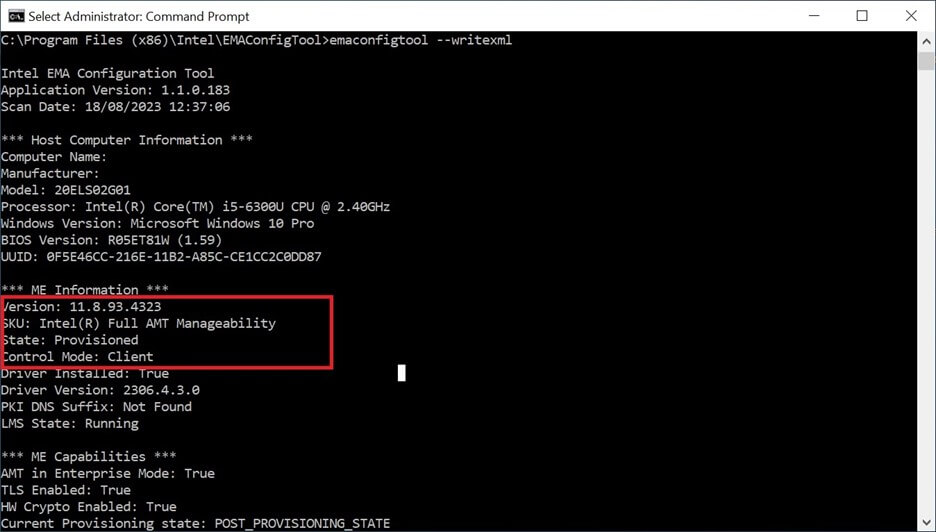
Install and run the Intel EMA configuration tool on the PC
Download the Intel EMA configuration tool.
Install the Intel EMA configuration tool. By default, the tool is installed in “C:\Program Files (x86)\Intel\EMAConfigTool.”
Open a CMD window in that directory with local administrator rights.
Execute the following command: EMAConfigTool.exe --writexml
The output will be shown on the console and stored in an XML file in the local directory, named based on the host (computer) name of the PC.
The value of the SKU should be one of the following:
Intel Full AMT Manageability (vPro Enterprise PC)
Intel Standard Manageability (vPro Essentials PC)
If the value of the SKU is “None,” “Unknown,” or “Consumer,” then it is a non-vPro PC.
Intel EMA agent is able to activate & configure Intel AMT for the following ME firmware versions
Intel Core Processor Generation
ME Firmware Version
Minimal ME Firmware Version
Recommended ME Firmware Version
6
11
11.8.79.x
11.8.94
7
11
11.8.79.x
11.8.94
8
12
12.0.70.1607
12.0.93
9
12
12.0.70.1607
12.0.93
10
14
14.0.45.1341
14.1.70
11
15
15.x.y.z
15.0.45
12
16
16.x.y.z
16.1.27
13
16
16.1.y.z
16.1.27
Intel AMT cannot get activated and configured by the Intel EMA Agent when the ME firmware version is 10 or earlier. The first number of the ME Firmware Version is linked to the Intel Core Processor Generation. In other words a ME Firmware update will never change the first number of the ME Firmware version
There are 2 provisioning methods:
Host-Based Provisioning (HBP): The simplest and default provisioning method. A vPro PC is provisioned in client control mode. User consent is enforced for Intel AMT functionalities such as Intel AMT Hardware KVM and Advanced Boot Options (e.g., Boot to BIOS, Boot to PXE, etc.).
Certificate Provisioning (TLS-PKI): A vPro PC is provisioned in admin control mode. User consent can be configured for Intel AMT functionalities such as Intel AMT Hardware KVM and Advanced Boot Options (e.g., Boot to BIOS, Boot to PXE, etc.).
For successful provisioning with Certificate Provisioning, certain conditions on the network or vPro PC need to be fulfilled.
This option is only available if an AMT Provisioning Certificate is uploaded to the tenant.
Test if Intel EMA Server is reachable from the PC port 8080:
Login with your credentials (user name & password) The Tenant Administrator needs to use the following credentials:
Open a browser and navigate to the Intel EMA server: https://emea1.mappcmanager.com
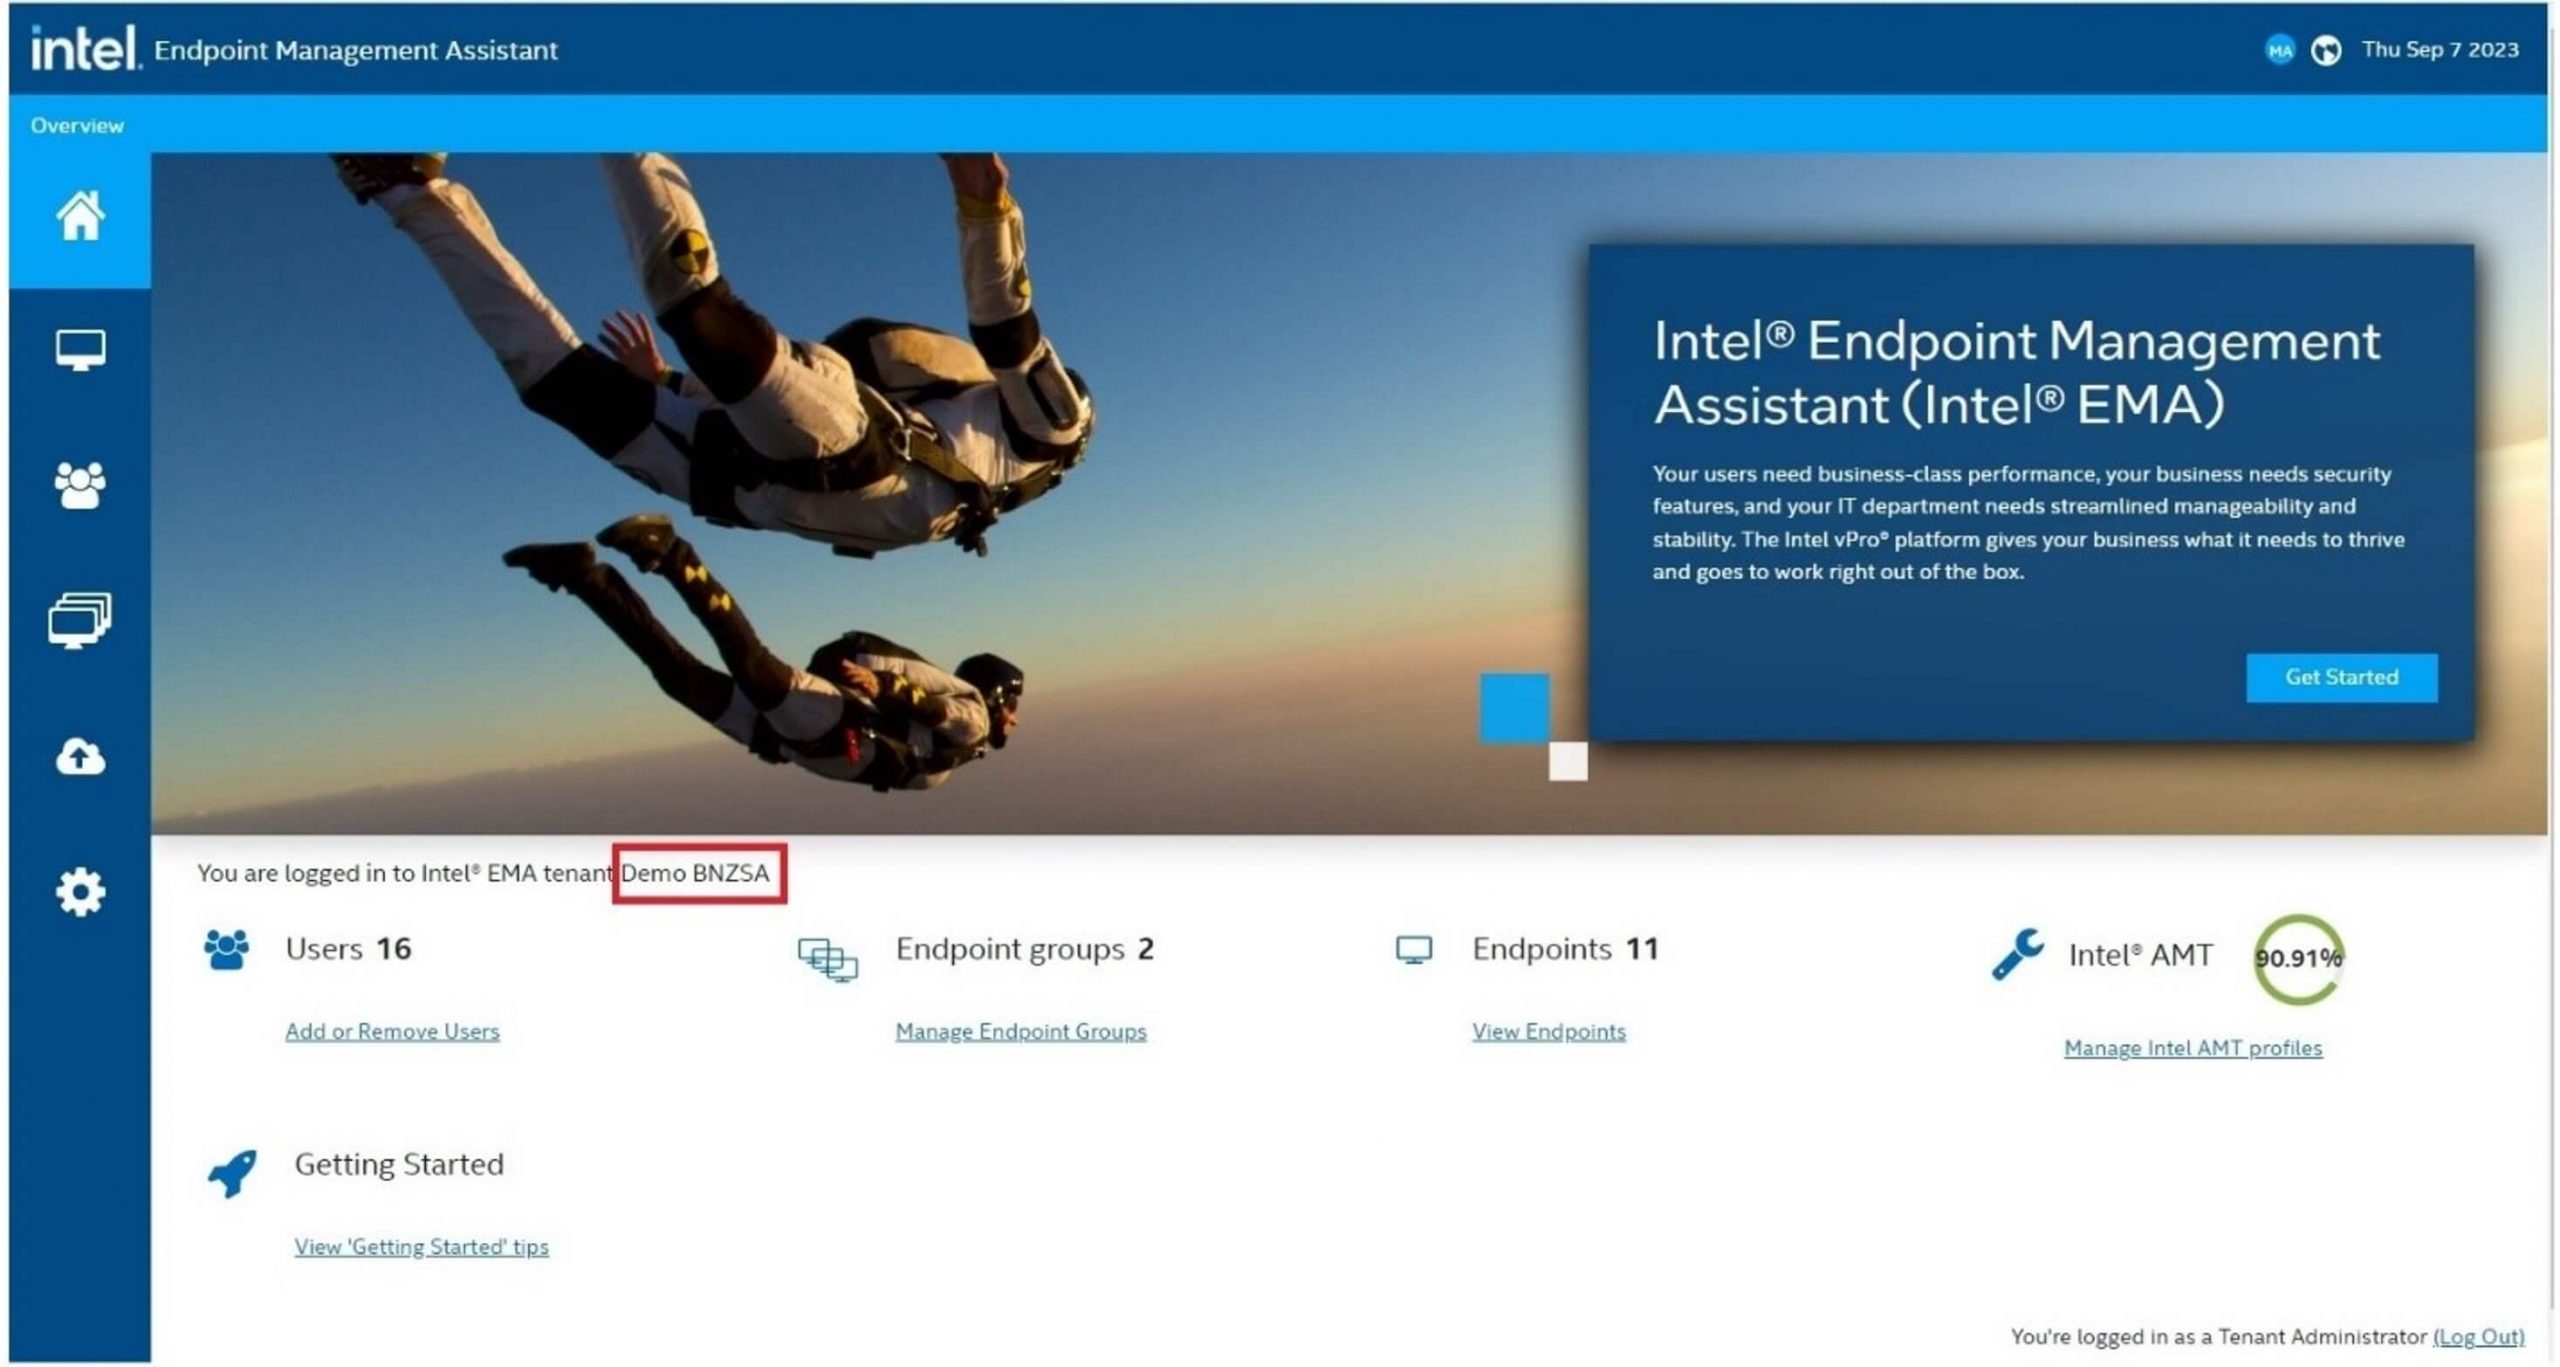
Once you have successfully logged in, you´ll be directed to tenant´s home screen. If you are in the correct environment, your tenant´s name (company name) should be displayed on screen.
Change your Password
To change your password, locate the small icon in the top right corner with your login initials. Click on the icon to initiate the password change process.
Your Tenant is created with a default endpoint group using a default Intel AMT profile.
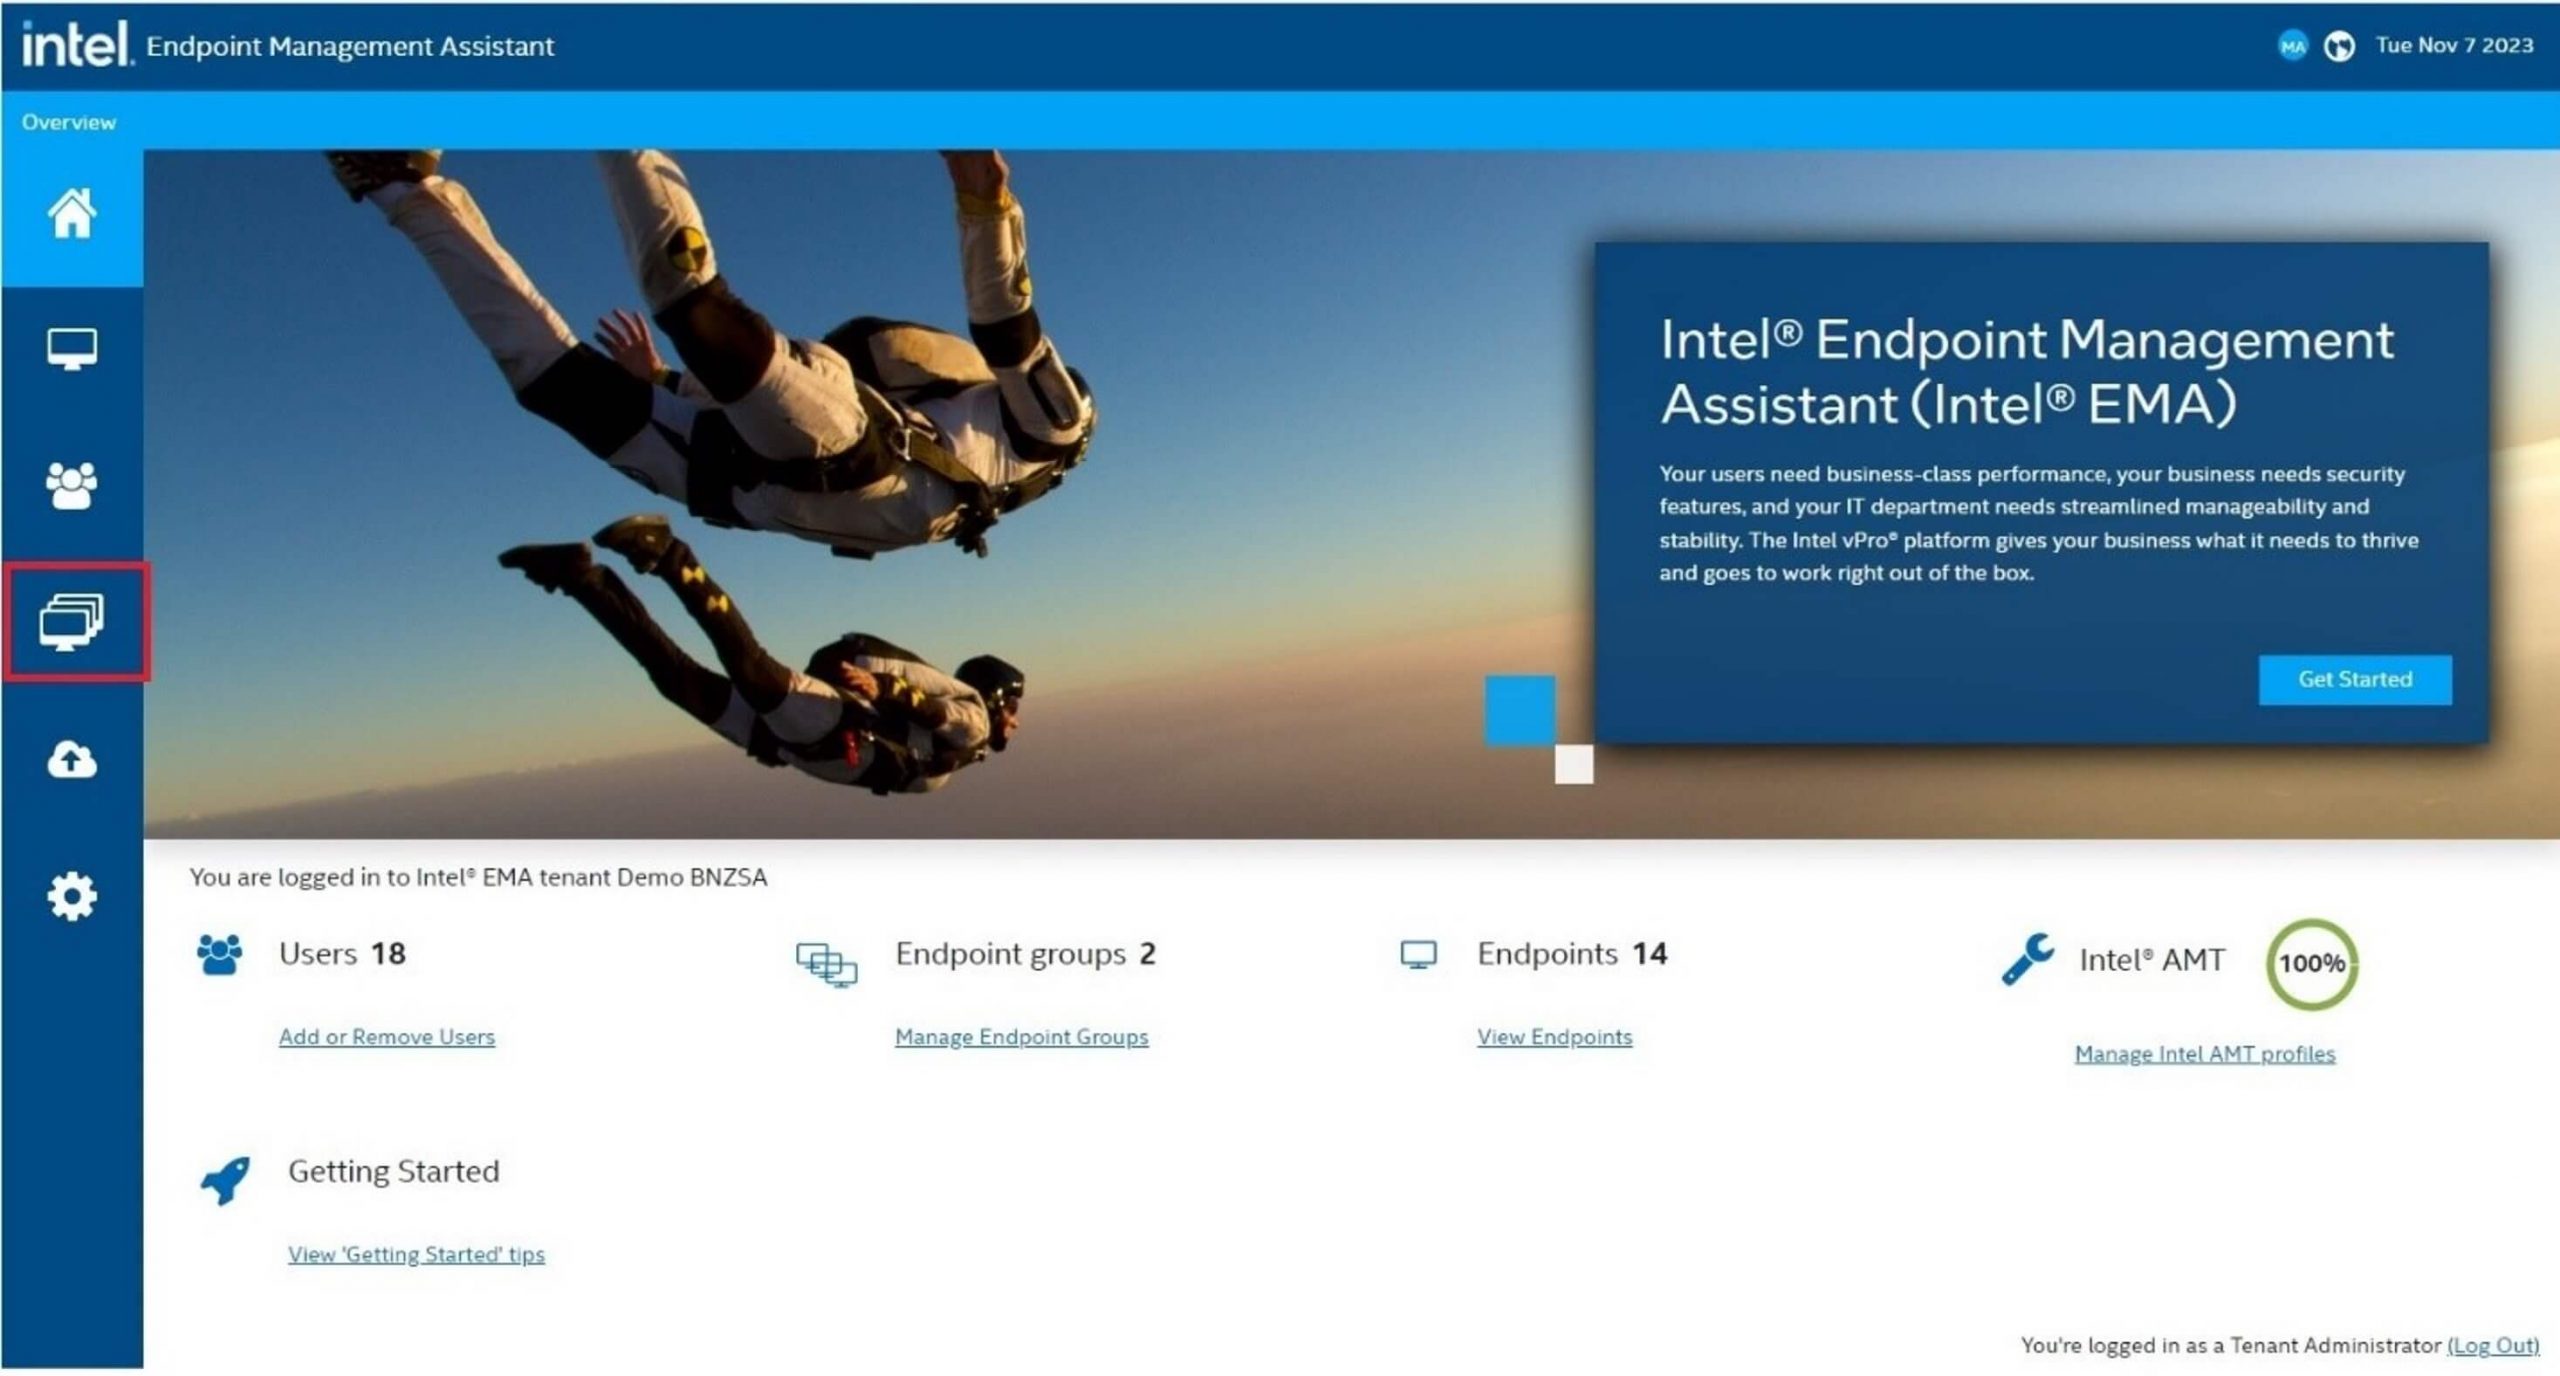
Endpoint Groups
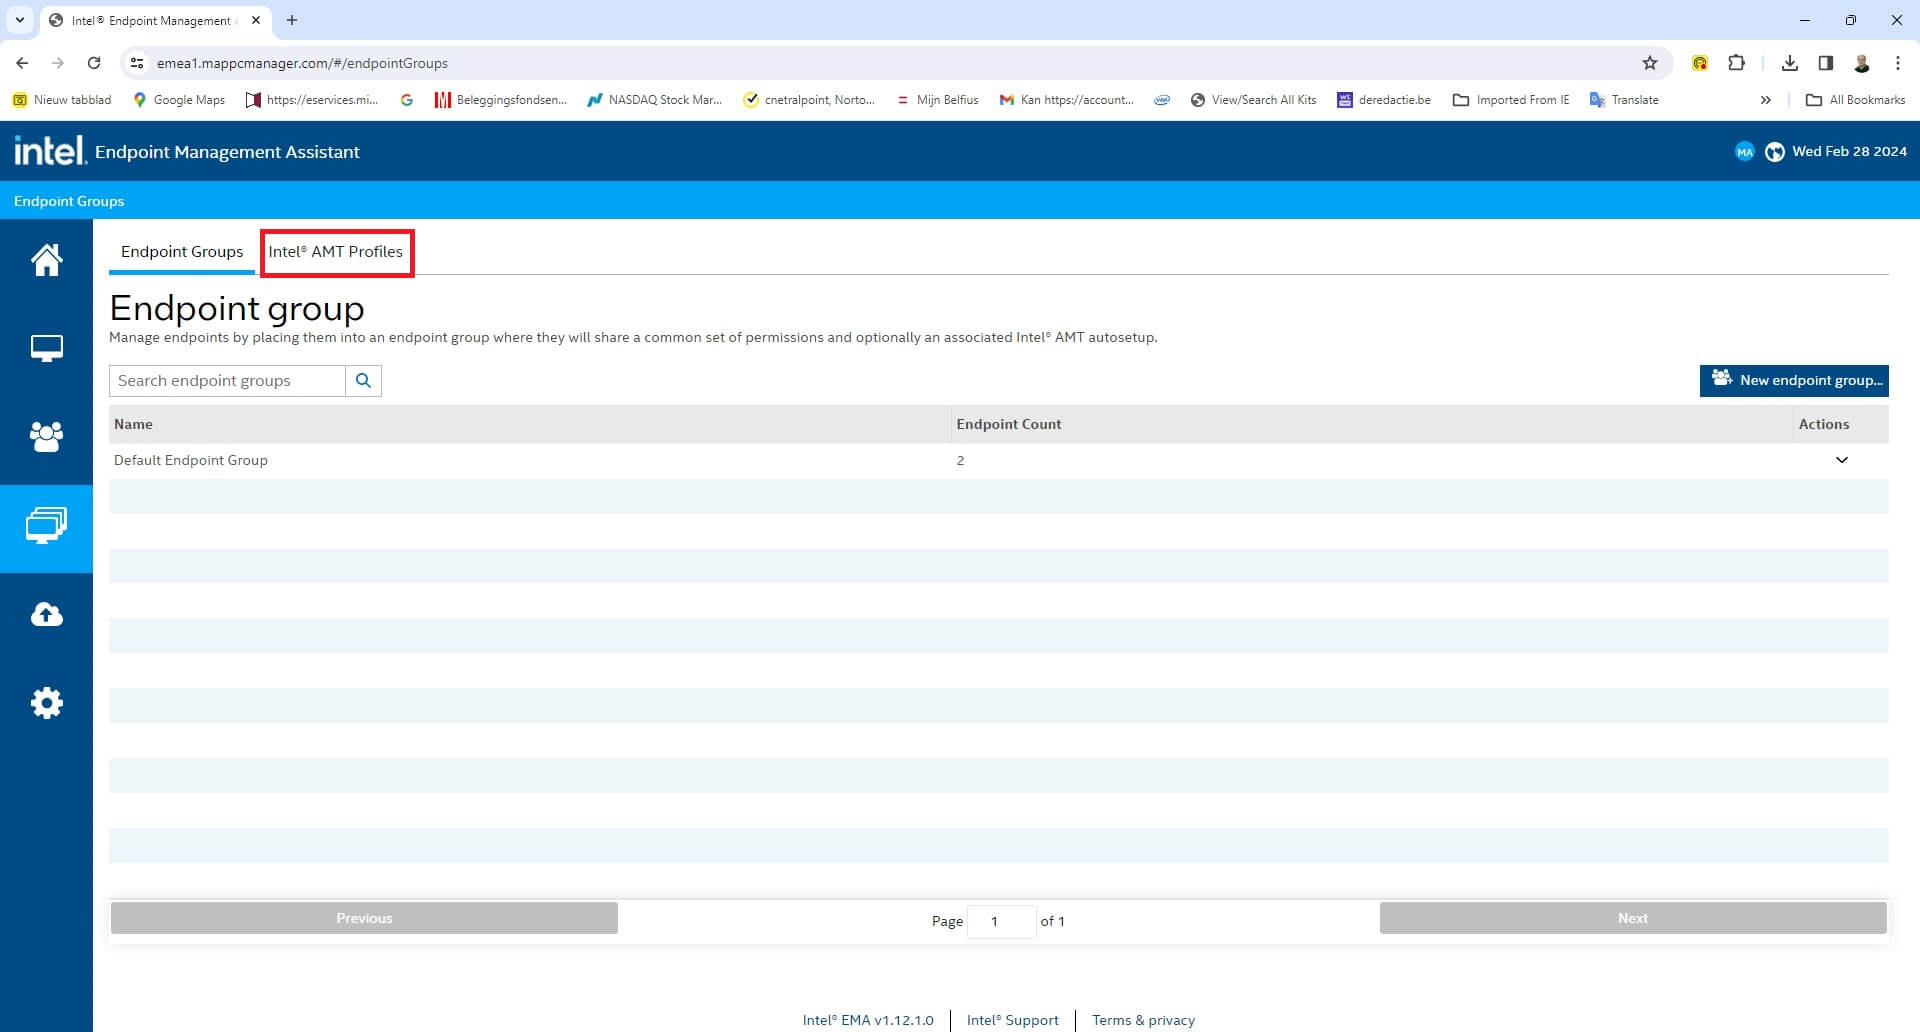
On the left sidebar, find and click on the “Endpoints Group” icon.
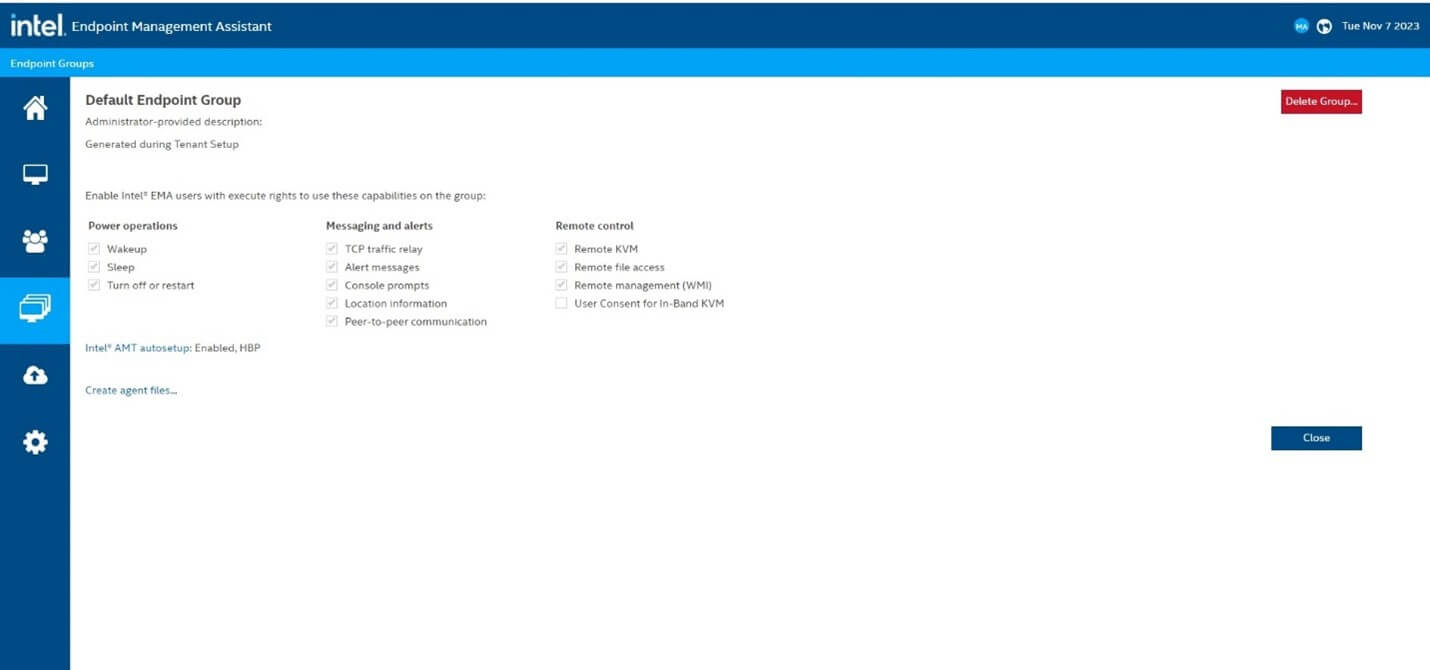
Within the endpoint groups screen, the endpoint group with name “Default Endpoint Group” is listed.
Remember, this “Default Endpoint Group” is automatically generated during tenant setup.
Intel AMT Profiles
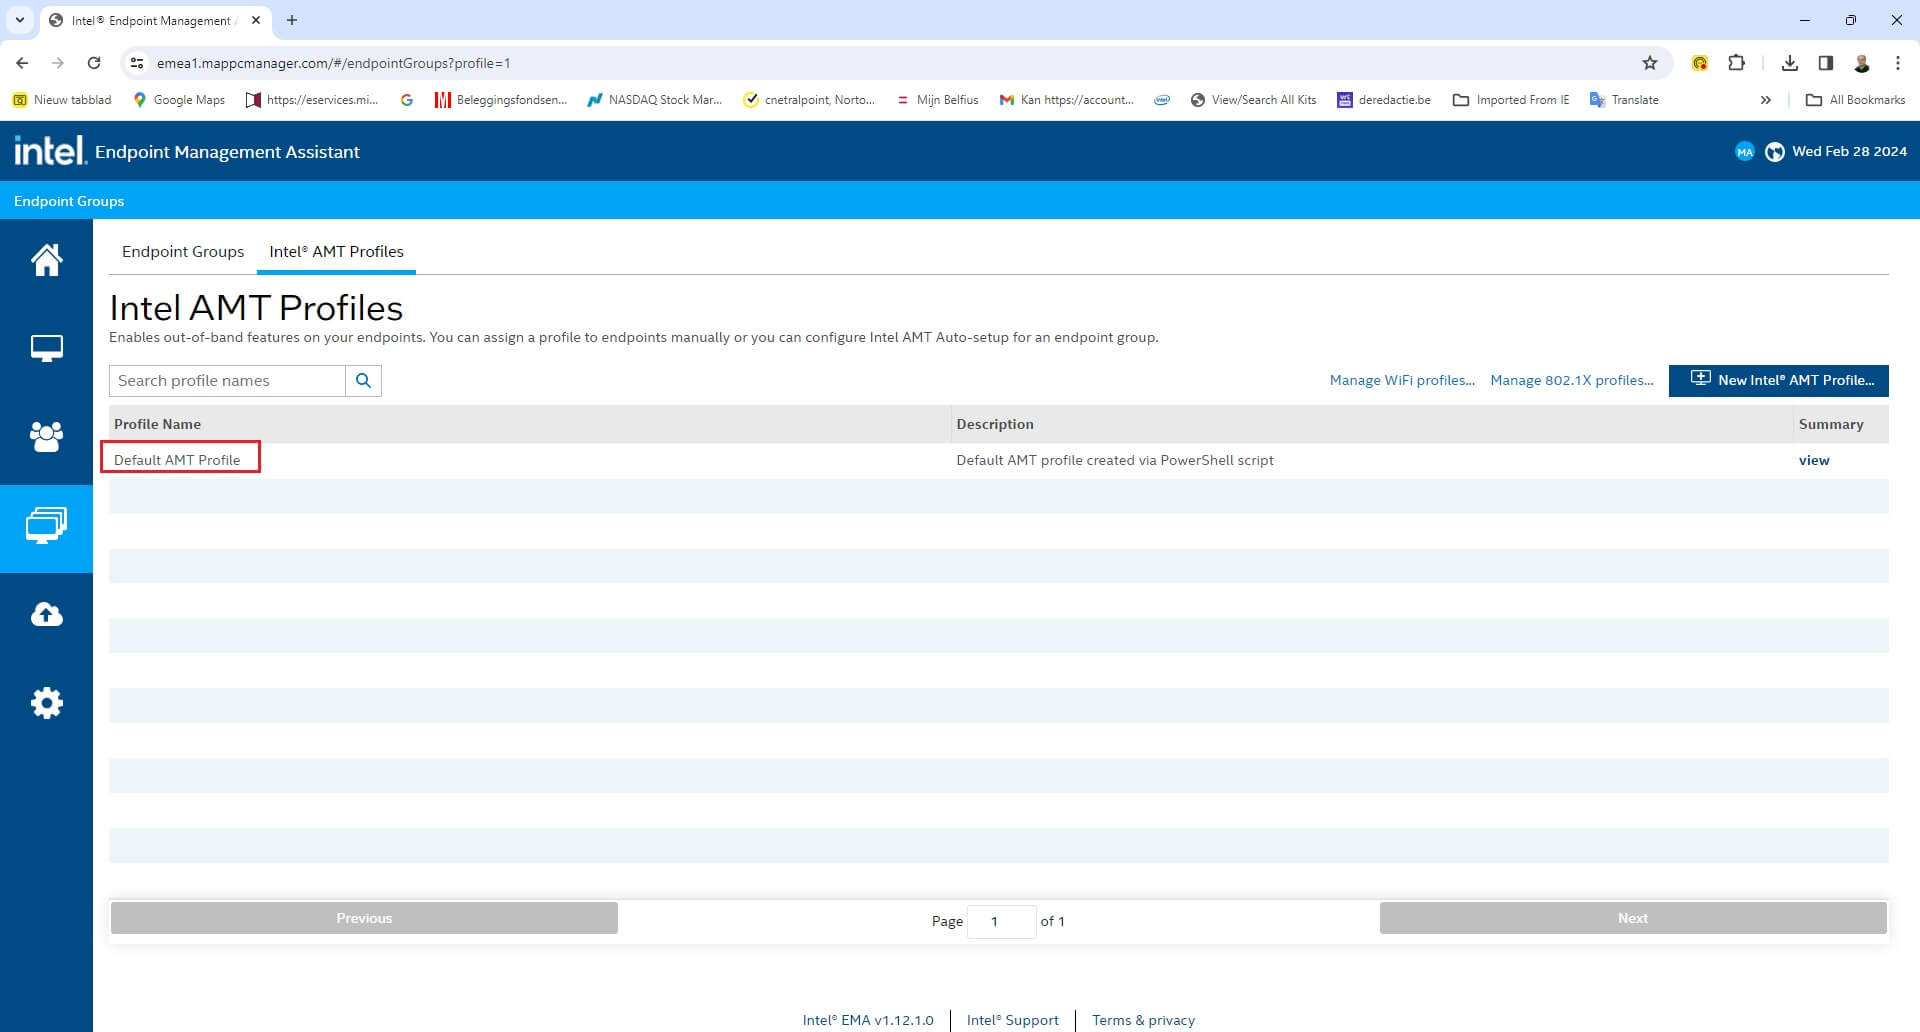
On the top of the screen click on “Intel AMT Profiles”.
The Intel AMT profile with name “Default AMT Profile” is listed: Remember, this “Default AMT Profile” is automatically generated during tenant setup.
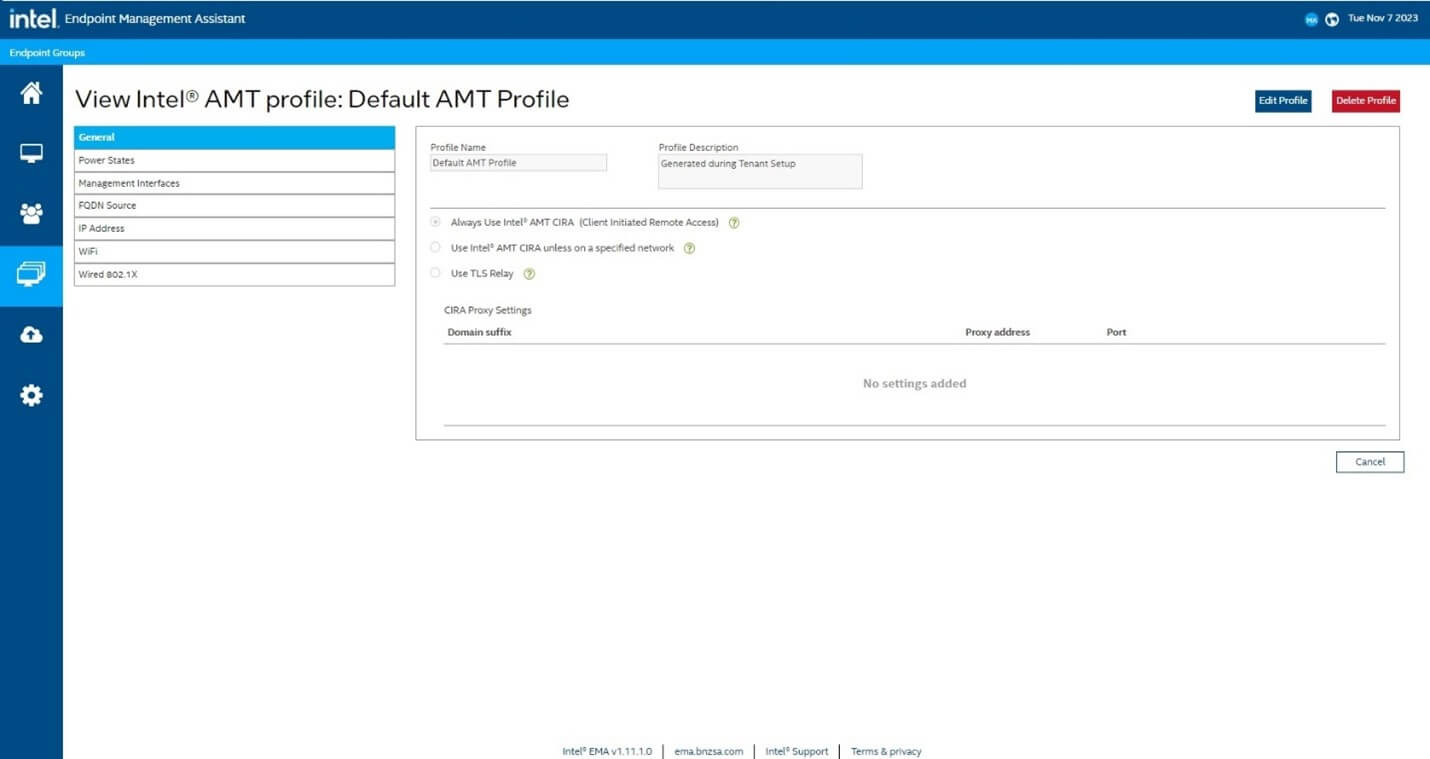
By clicking “View” you will see the details of the “Default AMT Profile”
Click on “Cancel” to return to the screen with the Intel AMT profiles. On the top of the screen click on “Endpoint Groups” to return to the screen with the endpoint's groups.
Endpoint Group Profile
Click the arrow under “Actions” and select “View Configuration” for detailed insights.
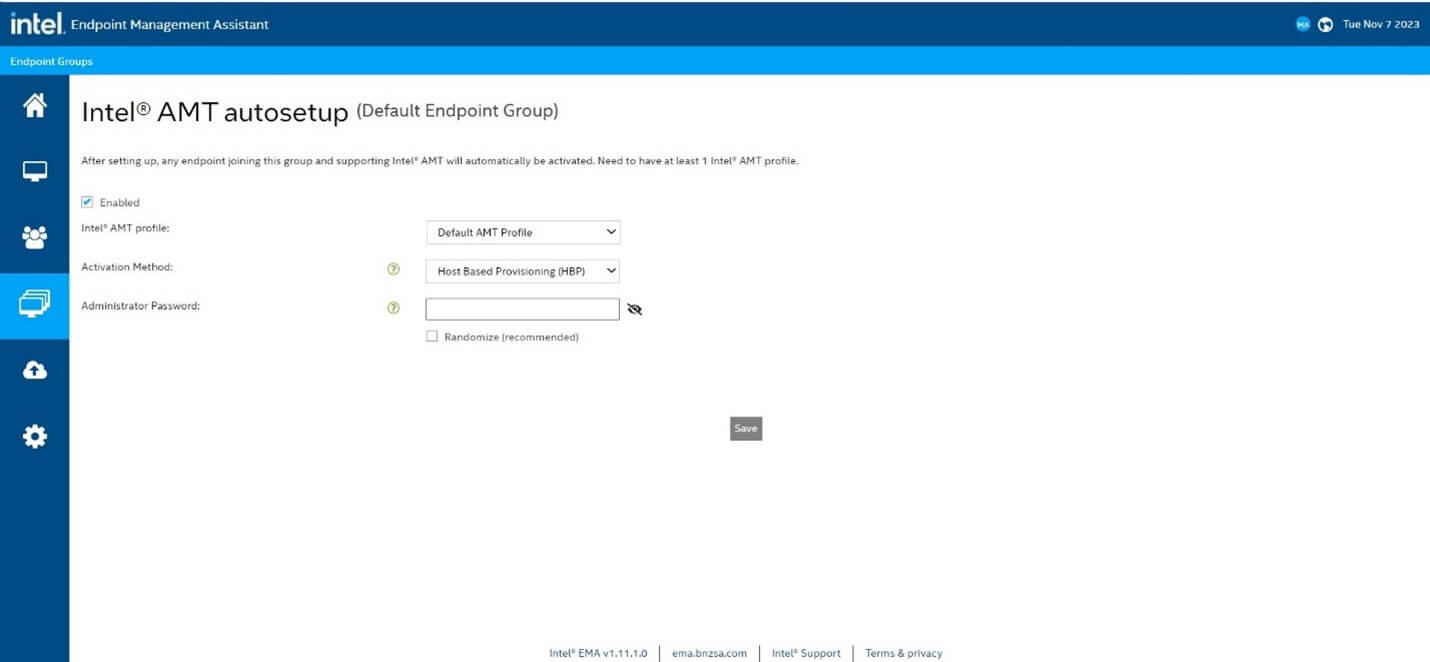
The configuration view provides information about permitted in-band functionalities within the endpoint group. Click on “Intel AMT auto setup” to get more details about the used Intel AMT profile and the selected AMT provisioning method.
Click in the left sidebar on the “Endpoints Group” icon to return to the list of endpoint groups. Of course, you can create your own endpoint groups and Intel AMT profiles (FAQ Question How to Set up Endpoint Groups and Intel AMT Profiles).
From the list of endpoint groups select the endpoint group you want to work with.
Creating Agent Files
Click the arrow next to the endpoint group´s name and choose “Create Agent Files”. In the "Generate Agent Installation Files" screen, download both the endpoint agent and the agent policy file. Manually copy these downloaded files to each PC (endpoint) where you intend to install the agent. Alternatively, utilize a distribution tool for this purpose.
Installing Agent as Local Administrator
Following the successful download, proceed to install the agent as a local administrator on each PC. Ensure that the agent and agent policy files have the same name and are kept together.
First Method:
Log in to the PC and navigate to the directory containing the two files.
Right-click on the EMAAgent.exe file and choose "Run as administrator."
The "Intel EMA Agent Installer" window will appear.
Click on "Install/Update."
Once the installation is complete, the popup window will disappear.
Verify the installation's success: Check if the "Intel EMA Agent background service” is running in the Windows Service.
Ensure a directory named "C:\Program Files\Intel\EMAAgent" is created, containing EMAAgent.exe and EMAAgent.msh.
Second Method:
Log in to the PC.
Open a command prompt window with local administration rights.
Navigate to the directory with the two files.
Use the command “emaagent.exe -fullinstall” to install the agent.
Verify the installation's success: Check if the "Intel EMA Agent background service” is running in the Windows Service.
Ensure a directory named "C:\Program Files\Intel\EMAAgent" is created, containing EMAAgent.exe and EMAAgent.msh.
Registration Process
The registration process runs automatically once the Intel EMA agent is successfully installed on the endpoint. The endpoint will be listed in the endpoint group that was used to download the 2 agent installation files. If the endpoint is a vPro PC, the provisioning will be done automatically when the Intel AMT auto setup is enabled in the endpoint group profile.
Endpoint Registration
Click in the left sidebar on the “Endpoints” icon to access the list of endpoints on you Intel EMA Web Interface.
Refresh the webpage with endpoints until it shows the endpoint that the Intel EMA agent is installed on.
Click on “view” for the endpoint.
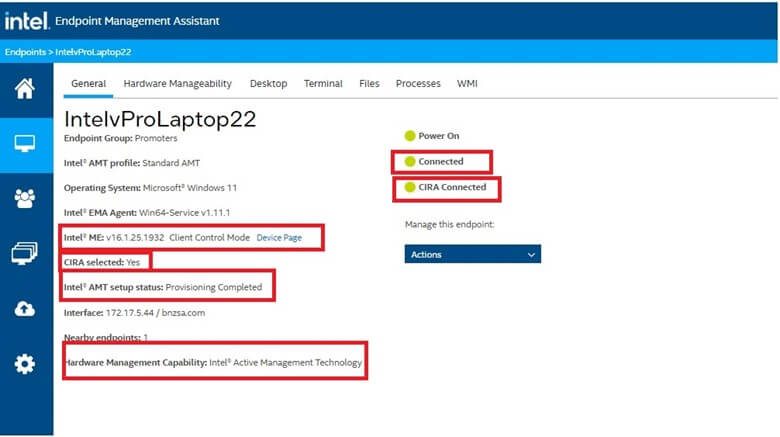
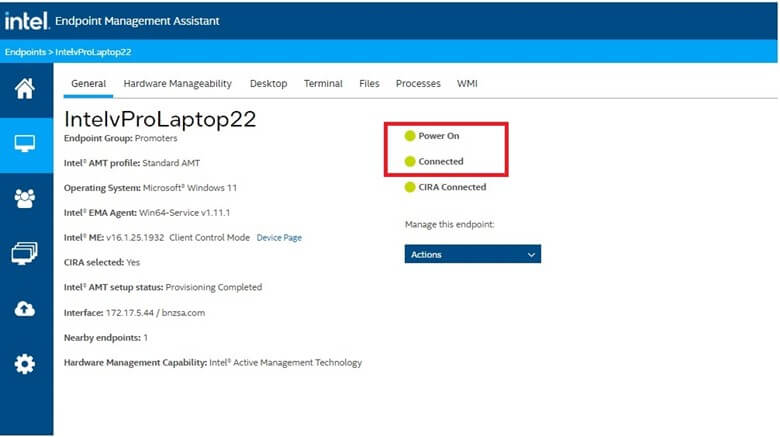
The General tab with detailed information about the endpoint will be shown.
First of all, check if the Intel EMA agent is connected.
If “Intel Active Management Technology” or “Intel Standard Manageability” is shown for Hardware Management Capability then you are dealing with a vPro PC.
Once the Intel EMA agent is connected, the provisioning process will start when it is a vPro PC.
You will probably see different phases when you refresh the webpage. Finally you should see Intel ME is in Client Control Mode and Intel AMT setup status is Provisioning Completed. CIRA (Client Initiated Remote Access) should now be connected.
Accessing Endpoints
Click on the “Endpoints” icon on the left sidebar to access the list of endpoints. On the left side, you can select filters based on the Endpoint Group, Connection Status, Power State or Intel AMT Status You have the possibility to launch actions on several endpoints at once. For instance, select multiple endpoints and click on Actions. You will see a dropdown menu of the possible actions, mainly power control commands. Some actions are greyed out since they cannot be executed on all selected endpoints.
Endpoint View
Let us focus on a particular endpoint. Click on “view” for an endpoint. The General Tab for the selected endpoint will be shown. Different tabs are available. The General Tab displays general information about the endpoint, such as power state and connection status. In the Hardware Manageability tab, you can perform out-of-band Intel® AMT operations. It can only be used when the endpoint is a vPro PC with Provisioning Completed and CIRA needs to be connected. The Desktop tab provides remote desktop functionality. It can be used when the EMA agent is connected. When the EMA agent is not connected this tab will be greyed out. The Terminal tab provides both in-band and out-of-band remote terminal functionality. Only text-based commands are supported. In order for the in-band remote terminal functionality to work the EMA agent needs to be connected. For the out-of-band remote terminal functionality to work CIRA needs to be connected. The Files tab provides in-band remote file browsing functionality. It can be used when the EMA agent is connected. When the EMA agent is not connected this tab will be greyed out. The Processes tab provides in-band remote process management functionality. It can be used when the EMA agent is connected. When the EMA agent is not connected this tab will be greyed out. The WMI tab allows to run a Windows Management Instrumentation (WMI) query or WMI action on the endpoint. It can be used when the EMA agent is connected. When the EMA agent is not connected this tab will be greyed out.
General Tab
Information in the left column
It starts with the Endpoint Group to which the endpoint belongs to.
The Intel AMT profile that is used to provision the endpoint
The Operating System shows the Windows version, Windows 10 or Windows 11, that is installed on the endpoint.
The version of the Intel EMA Agent that is installed on the endpoint
The Intel ME entry lists different pieces of information. Firstly is the version of the ME (Manageability Engine) firmware, also called AMT firmware. The first number (v16 in this case) is related to the generation of the Intel Core Processor and will never change by a firmware update. Next information, if the PC is provisioned, shows the provisioning mode: Client Control Mode or Admin Control Mode. “Device Page” will be shown if the functionality “Web-based User Interface” is enabled in the corresponding Intel AMT profile. “CIRA Selected” tells you if CIRA is selected in the corresponding Intel AMT Profile “Intel AMT setup status” provides the status of the provisioning process. If the Intel vPro PC is provisioned, it will say “Provisioning Completed”
Interface shows the local IP address of the endpoint. If the endpoint has different IP addresses, there will be different Interface entries.
Nearby endpoints shows the number of other endpoints that are locally detected.
Hardware Management Capability shows the remote management capabilities of the endpoint: Intel Active Management Technology for an Intel vPro (Enterprise) PC, Intel Standard Manageability for an Intel vPro Essentials PC, None for a non-vPro PC.
Information in the right column
The first bullet point displays the power status view of the Intel EMA server for the endpoint. When the bullet is green, the endpoint is “powered on” according to the Intel EMA server. When the bullet is yellow, the endpoint is “powered off” or in hibernate or sleep mode according to the Intel EMA server.
The second bullet point provides information about the Connectivity of the Intel EMA agent. When the bullet is green, the Intel EMA Agent is connected with the Intel EMA server. When the bullet is yellow, the Intel EMA Agent is not connected with the Intel EMA server.
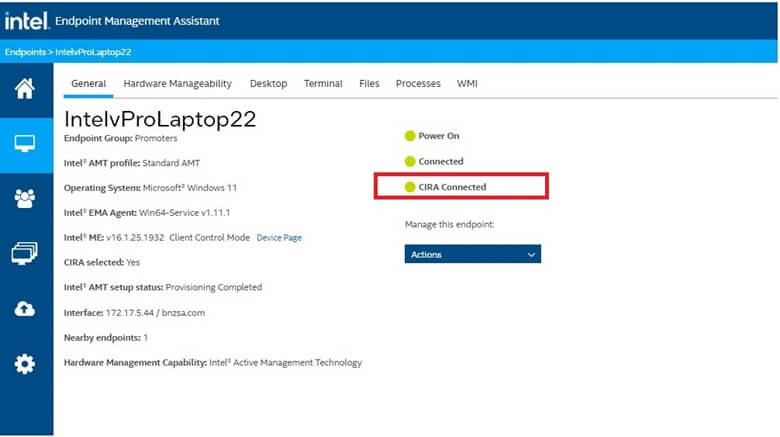
The last bullet point provides information on the Intel AMT Connectivity, aka CIRA (Client Initiated Remote Access). When the bullet is green, Intel AMT is connected to the Intel EMA server. This is required to use the “Hardware Manageability” tab. When the bullet is yellow, Intel AMT is not connected with the Intel EMA server.
Actions
If you click on Actions, a dropdown menu is shown providing commands that can be executed to manage the endpoint, such as power control commands.
I want to highlight one element that is shown in red: “Stop managing endpoint” By clicking on “Stop managing endpoint” a pop-up window will appear.
If you click “Take Action”, the endpoint and all the corresponding information will be removed from the Intel EMA server. I recommend that you only perform that action after that the corresponding PC is un-provisioned and the agent is un-installed on that PC.
All Intel EMA In-Band Functionality is only available
when the endpoint is up and running. The first bullet point showing the power status should be green.
when the Intel EMA agent is connected with the Intel EMA server. So, the second bullet point should also be green.
Desktop Tab
Click on Desktop. Click on Connect.
User Consent for In-Band KVM is not selected in the profile of the endpoint group: no user consent window popping up on the remote PC
User Consent for In-Band KVM is selected in the profile of the endpoint group:
a user must be logged onto the remote PC
Duplicate existing rows to add more.
Accessing Endpoints
The Remote Desktop Functionality allows the complete control on the remote PC.
You can choose to Go Full Screen. You are able to start applications, such as a web browser, a command window, … on the remote PC.
Click on the Escape Key on the console to return to the normal screen
Click on the red Disconnect icon to finish the remote desktop session.
Files Tab
Click on Files. Click on the blue box “Connect to Files”. If you are connected, the icon will change to “Disconnect” in a red box.
File Commands are becoming available and available commands are shown in blue instead of gray.
Browse through the files, by clicking on the disk symbol or on the name of the directory:. Different file handling functionalities as upload, download, delete, rename, create New Folder, …. are available.
Processes Tab
Click on Processes. Click on the blue box “View Processes” If you are connected, the icon will change to “Disconnect” in a red box.
Process Commands will become available and will be shown in blue instead of gray. You can launch or terminate a process.
WMI Tab
Click on WMI. WMI stands for Windows Management Instrumentation. To really make use of this functionality, you must know how to use the different WMI classes on a Windows PC. You can launch a WMI query or a WMI action.
Terminal Tab (In-Band Terminal Functionality)
Click on Terminal. Click on the dropdown menu of the blue box “Actions”. Click on Start Terminal. It starts a Terminal session.
Once the Terminal session starts, type “help” and it will show the supported commands that you can execute remotely on the PC. For example you can open a shell in the background on the PC by using the command window “cmd”.
At the end, choose “Actions” from the dropdown menu on the blue box again. Click on Disconnect to end the Terminal session.
Intel AMT functionality can only be used when CIRA is connected. So, the bullet point concerning CIRA should be green.
Hardware Manageability Tab
Click on Hardware Manageability.
A window called “System Status” will gradually show the information that is received directly from the Intel vPro PC. Before we start with an overview of all the information, I want to highlight the following: the information that is shown in blue, can be clicked on. You will get a popup window allowing you to perform an action or change a setting.
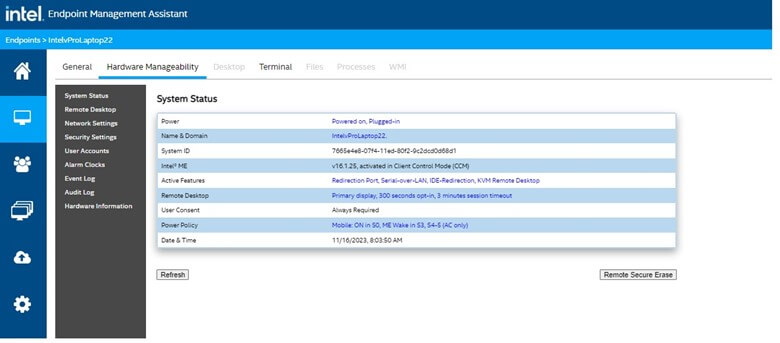
System Status
Let´s start with the overview of the information shown by System Status. On the first line the Power status of the PC is shown. It is also shown if the PC is plugged-in or working on battery. Click on that information and the Power Dialog window pops up. There will be a drop down menu of all possible power control commands that can be executed. Click on “Only Show Valid Commands” After a while, loading the information needs to be finished, only the power control commands that can be executed in the current status of the vPro PC will be shown. Click on “Cancel” Next Line shows the Intel AMT hostname & domain name. Due to the settings in the Intel AMT profile these names are synched with the OS hostname and domain name. You can click on it and change the AMT hostname & domain name, but in general there is no reason to change these names. Next line contains the System ID. It is a unique identifier of an Intel vPro PC. The Intel ME line lists 2 pieces of information. Firstly is the version of the ME (Manageability Engine) firmware, also called AMT firmware. The first number (v16 in this case) is related to the generation of the Intel Core Processor and will never change by a firmware update. It also lists how Intel AMT is activated on the vPro PC: Client Control Mode or Admin Control Mode. The line of the Active Features shows the Intel AMT functionalities that are selected in the Intel AMT profile. It can be changed per endpoint. There are normally 4 features displayed: Redirection Port, Serial over LAN, IDE Redirection, KVM Remote Desktop. Redirection Port needs to be enabled otherwise the other Intel AMT functionalities cannot be used successfully. Next line lists some characteristics of the Intel AMT Hardware KVM or Remote Desktop functionality. It can be changed per endpoint. The Default display that will be shown. Opt-in Timeout: The time you have to enter the user consent Session Timeout: The remote desktop session will end automatically if there is no activity during this period. Port 5900, which is only visible in the popup window: Do not to enable this port. Next line lists when User Consent will be required. User Consent is grey and not changeable when the vPro PC is provisioned in client control mode User Consent is blue and changeable when the vPro PC is provisioned in admin control mode Next line provides the Power Policy settings defining when Intel AMT can be used. It can be changed per endpoint. There are 2 options, only when the PC is up and running or in all power states. The last line shows the Date & Time of the Manageability Engine. It is the current date and time in UTC format. That is all information available on the “System Status” window. Let´s have a look at the other ones.
Remote Desktop
Click in the left bar on “Remote Desktop” It provides the Intel AMT Hardware KVM or out-of-band Remote Desktop functionality. If the PC is not powered up, let´s start with waking up the PC.
Click on “Power Actions”
Select “Power Up” in the “Power Dialog” popup window
Click “OK”
Notice that the remote PC starts to boot. Wait until the PC is up and running
Click on Connect.
A 6 digit User Consent will show up on the screen of the Intel vPro PC. Enter the 6 digits in the management console. The Intel AMT Hardware KVM session will start and you will have full remote control on the endpoint.
Also notice the red-yellow blinking framework on the screen of the Intel vPro PC. This is to inform the user of the Intel vPro PC that an Intel AMT Hardware KVM session is active.
If there is more than one display connected to the Intel vPro PC, you can choose which display you want to see remotely. At the bottom, you can select Primary display, Secondary display, … You can also choose “Full Screen” on the management console.
Let´s now restart the Intel vPro PC and boot the PC into BIOS.
Click on “Power Actions”.
Select “Reset to BIOS” in the “Power Dialog” popup window.
Click “OK”.
Notice that the PC is rebooting and entering the BIOS.
You can go to the different BIOS screens and change BIOS settings.
You could simply exit the BIOS, but we can also force a reboot.
Click on “Power Actions”
Select “Force Reset” in the “Power Dialog” popup window
Click “OK”
Notice that you can follow the complete boot process. You will not lose the connection during the boot process.
Finally, you return to the login screen of the Intel vPro PC. Click on “Disconnect” to end the Intel AMT Hardware KVM session.
Network Settings
Click on the next tab in the left bar: “Network Settings” The “Network Settings” window provides information on the status and the settings of Intel AMT on the different interfaces (wired and/or wireless) of the vPro PC If there are profiles explicitly defined for Intel AMT, via the Intel AMT profile or individually for the endpoint, these WiFi profiles will be listed.
Security Settings
Click on the next tab in the left bar: “Security Settings” The “Security Settings” window shows information about the certificates that are used for the CIRA connection between the endpoint and the Intel EMA server.
User Accounts
Click on the next tab in the left bar: “User Accounts” The “User Accounts” window shows the Intel AMT users used by the Intel EMA server, such as EMA-user, for using the Intel AMT functionality. The default AMT administrator (admin) is also listed.
Alarm Clocks
Click on the next tab in the left bar: “Alarm Clocks” The “Alarm Clocks” window shows the alarms clock that are currently active on this endpoint. Click on “Add Alarm”. An “Alarm Clock” popup window appears. It allows you to enter a new alarm clock. If you change “Delete on Completion” to “No”, you are able to define a repetitive alarm. The endpoint will wake up when the alarm goes off. Take into account that the time is displayed in UTC format.
Event Log
Click on the next tab in the left bar: “Event Log” The “Event Log” provides an overview of system events, such as a reboot of the endpoint.
Audit Log
Click on the next tab in the left bar: “Audit Log” The “Audit Log” provides an overview of the Intel AMT functionality used on the endpoint. Click on “Click here to load the audit log” to get the audit log.
Hardware Information
Click on the next tab in the left bar: “Hardware Information” The “Hardware Information” provides an overview of the hardware & firmware components of the Intel vPro PC. It is up-to-date information that is sent from the Intel vPro PC to the Intel EMA server each time you click on the “Hardware Manageability” tab. This up-to-date overview is also available when the vPro PC is powered off or crashed.
Terminal Tab (Out-Of-Band Terminal Functionality)
It allows to connect via Serial Over LAN, alias SOL, to the Intel AMT interface and to boot the PC remotely into BIOS.
Terminal Tab
Click on Terminal. Choose “Actions” from the dropdown menu on the blue box . Click on Start AMT Terminal. It will start an AMT Terminal session and the following message will be displayed: “Terminal is connected. Waiting for display data…” Choose “Action” from the dropdown menu on the blue box. Click on Power cycle to BIOS. A popup window will show “User Consent required” The popup window will appear when the PC is provisioned in Client Control mode or when the user consent is set for “Advanced Boot Options” in the Intel AMT profile. As mentioned in the popup window the remote PC must be powered on to see the user consent code. A popup containing a user consent code with 6 digits will appear on the remote PC window. The 6 digits need to be entered in the pop-up window on the console. Click Next PC boots to BIOS in text mode. You can go through the different BIOS screens and change any settings. You can exit the BIOS, as shown in the BIOS. The PC will boot normally and nothing will be shown on the console. At the end, Choose “Actions” from the dropdown menu on the blue box again. Click on Disconnect to end the Intel AMT Terminal session. Instead of exiting the BIOS, you could also go back to the General tab of the endpoint and use a power control command to reboot the PC.
You can add other users to manage the endpoints in your tenant.
Creating Users
Accessing “Users”
On the left sidebar, find and click on the “Users” icon
Creating a User
Within the “Manage Users” screen, you´ll find at least one user with the User name provided by you and with the role of “Tenant Administrator”. Click on the blue box “New User” on the right to add a user. A window pops up to create a new user Enter a user name. The format needs to be an email address. Provide a description. Provide a valid Password and confirm the Password Select the role of the user. You have the choice between:
Tenant Administrator: A tenant administrator can perform all operations (user management, endpoint management) in the tenant.
Account Manager: An account manager can perform user management only. Account Managers cannot perform endpoint management.
Endpoint Group Creator: An endpoint group creator can perform endpoint management, as well as create new endpoint groups and manage Intel AMT Profiles.
Endpoint Group User: An Endpoint Group User can perform endpoint management only.
Click on Save. You´ll be taken back to the screen showing the different users, where you newly created user will be listed. Use the same process to create different users.
Endpoint Removal Process
3 steps are needed to remove an endpoint of the Intel EMA Web interface. If it is an Intel vPro PC, you will need to un-provision the PC. The Intel EMA agent then needs to be un-installed Finally you can remove the endpoint from the tenant.
Un-provisioning Process
Starting from the General Tab
We´ll start the process by navigating to the General tab of an endpoint. The 1st step, un-provisioning the PC, is only needed when the endpoint is an Intel vPro PC with Provisioning Completed. Otherwise you can skip this first step.
Un-provisioning the Intel vPro PC can only be done when the endpoint is up and running. The first bullet point of the power status should be green. The Intel EMA agent needs to be connected to the Intel EMA server. So, the second bullet point should also be green.
If both bullets are not green, you will not be able to un-provision the Intel vPro PC.
Un-provisioning
Click on Actions Select “Provision Intel AMT” from the dropdown menu. The “Remote Intel AMT Provisioning” window pops up. Click on “Remove provisioning” You get a popup window asking to confirm the un-provisioning process. Click Continue. Close the “Remote Intel AMT Provisioning” window. The Intel AMT setup status in the General tab should show “Deactivate Completed”. Or refresh the web page until you get this message. Notice also that CIRA is not connected anymore. The first step is completed.
Un-installation of Intel EMA Agent
Do not reboot the vPro PC or wait too long after un-provisioning the vPro PC to uninstall the Intel EMA agent. Otherwise the agent will discover that the Intel vPro PC is not provisioned and will restart the provisioning process.
First Method
Log in to the PC and navigate to the installation directory of the intel EMA Agent. The default installation directory is “C:\Program Files\Intel\EMAAgent” Right Click on the EMAAgent.exe file and select “Run as administrator” The “Intel EMA Agent Installer” window will pop up. Click on “Uninstall” The popup window will disappear when the EMA agent is uninstalled. It is possible that you will receive an error message stating that deleting the EMAAgent directory failed. If that is the case, it is recommended to delete the directory manually. You can check if the uninstallation is successful. In the Windows Service the “Intel EMA Agent background” service should be disappeared. Take into account that you could use the in-band remote desktop functionality of that endpoint on the Intel EMA Web Interface to uninstall the Intel EMA Agent. Once the Intel EMA agent is uninstalled, Intel EMA will lose the connection with the endpoint.
Second Method
Log in to the PC Open a command prompt window with local administration rights and navigate to the installation directory of the intel EMA Agent. The default installation directory is “C:\Program Files\Intel\EMAAgent” Use the following command “emaagent.exe -fulluninstall” to uninstall the agent. It is possible that you will receive an error message stating that deleting the EMAAgent directory failed. If that is the case, it is recommended to delete the directory manually. You can check if the uninstallation is successful. In the Windows Service the “Intel EMA Agent background” service should have disappeared. Take into account that you could use the in-band remote desktop functionality or in-band terminal functionality of that endpoint on the Intel EMA Web Interface to uninstall the Intel EMA Agent. Once the Intel EMA agent is uninstalled, Intel EMA will lose the connection with the endpoint. As a result, the Intel EMA agent is not connected anymore.
Removing the Endpoint
The last step is Removing the endpoint from the tenant. Back to the General tab of the endpoint on the Intel EMA Web interface. Click on Actions Select “Stop managing endpoint” in the dropdown menu. Click on “Take Action” You will return automatically to the list of endpoints belonging to the tenant. The endpoint will be removed from the Intel EMA Web interface.
Important
The order of these steps is quite important. The Intel EMA agent is needed to remotely un-provision an Intel vPro PC. As already mentioned, do not reboot the Intel vPro PC or do not wait too long after un-provisioning the Intel vPro PC to uninstall the EMA agent. Otherwise the agent will discover that the Intel vPro PC is not provisioned and will re-start the provisioning process. Never remove an endpoint from the tenant if the endpoint is still provisioned. When you remove an endpoint from the tenant, all information will be deleted, including the Intel AMT administrator password. That password could be needed to un-provision the Intel vPro PC. If you remove an endpoint from the tenant without uninstalling the agent, the agent will re-connect with the Intel EMA server and the endpoint will re-appear in the list of endpoints of the tenant.
You can add other endpoint groups and create new Intel AMT Profiles.
Setting up an Intel AMT Profile
On the left sidebar, find and click on the “Endpoints Group” icon. On the top of the screen click on “Intel AMT profiles”. Click on "New Intel AMT Profile". You need to provide details for the various sections on the left side.
General
In the general tab of the new AMT profile:
Enter a distinctive profile name.
Add a profile description.
Choose "Always Use Intel AMT CIRA” as the communication method between the Intel AMT server and endpoints.
If proxy settings are required, you need to discuss them with MAP services.
Power States
Click on "Power States." Choose the default and recommended choice: "Anytime the system is connected to power."
Management Interfaces
Click on "Management Interfaces." Choose the Intel AMT functionalities you wish to use.
“KVM (Keyboard/Video/Mouse) redirection” allows to take remotely full control of the PC, independently of the state of the OS.
“User Consent” presents the user in front of the remote endpoint with a consent code of 6 digits to allow remote management interaction with the endpoint. For the default provisioning mode (Client Control Mode), user consent is enforced regardless of options selected here. Set the timeout for entering the 6-digit user consent code. Adjust as needed.
“Web-Based User Interface” enables remote management through an AMT web browser interface.
“Serial over LAN” enables remote BIOS setting changes in text mode.
“IDE/USB redirection” allows to map drives remotely
“One-Click Recovery” enables initiating a remote recovery process to return a device’s operating system to its last good known state. This Intel AMT feature is currently not available on most Intel vPro PCs.
“Remote Platform Erase” allows to remotely erase all of a platform’s information. This Intel AMT feature is currently not available on most Intel vPro PCs.
FQDN Source
Click on "FQDN Source." This defines how the host name and domain name will be set in Intel AMT. The recommended setting is "Shared with Host OS." This means the AMT host name will be the same as the OS host name, and the domain name will remain blank.
IP Address
Click on "IP Address." This setting determines how Intel AMT will obtain the IP address of the endpoint. Select "From the DHCP server" when the endpoint is assigned an IP address automatically from DHCP. This is the recommended configuration as it simplifies IP address management. If the endpoint has a statically assigned IP address, choose "Use a static IP address from Host."
WiFi
Click on “WiFi”
Use the Selected WiFi Profiles
You can create WiFi Profiles (e.g. WiFi profile used in your organization)
If WiFi profiles are created, they will be listed and you can select these profiles
To synchronize Wi-Fi profiles between OS and Intel AMT, select “Synchronize with host platform Wi-Fi Profiles”. When an endpoint connects to a Wi-Fi profile at OS level, the profile will be automatically synched to Intel AMT, so that Intel AMT can make use of that Wi-Fi profile.
Select “Enable WiFi connection in all system power states.” It allows to use Intel AMT over WiFi also when the endpoint is not up and running. It is recommended.
“Enable WiFi profile sharing with UEFI BIOS”. Recommended but it will be only useful for AMT functionalities as One Click Recovery.
Wired 802.1X
Cannot be used After adjusting all the settings, click "Save" to apply the changes.
You'll be taken back to the Intel AMT profiles screen, where your newly created profile will be listed.
Creating an Endpoint Group
On the top of the screen click on “Endpoint Groups”. For a new endpoint group, click "New Endpoint Group." Enter a name, description, and password. The password can be used later to change specific endpoint group settings.
Defining Group Policy and Functionalities:
In the group policy setup, determine the desired in-band functionalities. Choose individual functions or select all for comprehensive inclusion. “User consent for in-band KVM” is significant. Selecting this option prompts users for permission when using remote in-band desktop functionality. Note that the user must be logged onto the PC for this to work. The remote in-band desktop functionality cannot be used on a PC that is up and running but where no user is logged in, if this option is selected.
Setting Up AMT Provisioning:
Click on “Save & Intel AMT AutoSetup" at the top. Choose "Enabled" and the appropriate Intel AMT profile from the drop-down menu. Choosing Activation Method: Select the activation method - either host-based provisioning (HBP)or certificate provisioning (TLS-PKI). The latter requires specific network conditions and an uploaded AMT provisioning certificate. If no AMT Provisioning Certificate is uploaded in the tenant only Host Based Provisioning is available. Administrator Password Options: For the AMT administrator password, choose between randomized and custom password options. Finalize by clicking "Save" at the bottom. The button should be blue once your selections are made. The endpoint group that you created should be part of the list.
If it is an Intel® Core™ Processor:
The generation is indicated by the first number after i9, i7, i5, or i3. For example, in the Intel® Core™ i9-11950H processor, the number 11 indicates it is from the 11th generation
If it is an Intel® Core™ Ultra Processor:
The generation of the processor is the first number after Ultra 9, Ultra 7, Ultra 5 or Ultra 3. Here is an example: Intel® Core™ Ultra 7-165U Processor is 1st generation because the number 1 is listed after Ultra 7
Using Windows Command Prompt:
Open Command Prompt and type: wmic cpu get name
This will display the processor name of the CPU in the system.
System Information On Windows:
Press Windows + R, type msinfo32, and press Enter.
Look for the “Processor” field to find the CPU name and generation.
Centralized Inventory Tools:
Press Windows + R, type msinfo32, and press Enter.
Look for the “Processor” field to find the CPU name and generation.
Developed by Intel, the vPro® Platform is a PC built for business containing different components (CPU, GPU, NPU, Connectivity) and a suite of hardware and firmware technologies delivering together exceptional performance, stability, security, and manageability. The easiest way to recognize a vPro Platform, is to look for the Intel CPU branding sticker on the Platform, it needs to contain "vPro”.
The easiest way to recognize an Intel vPro PC is to look for the Intel CPU branding sticker on the PC. The sticker needs to contain “vPro”.
There are tools and PowerShell scripts available that can be used to discover of a PC an Intel vPro PC is. How these tools can be used, you can look to Question 3 at Fleet Validation Process. Take into account that you still need to collect the information centrally.
Intel vPro Enterprise: Offers advanced management, security, and productivity features, ideal for larger enterprises with complex IT needs.
Intel vPro Essential: Provides foundational security and manageability, suited for small to medium-sized businesses.
The technology in a Intel vPro Platform responsible for the unique remote management capabilities is Intel® Active Management Technology (Intel AMT).
The Intel AMT is present in an Intel vPro Platform, but the technology needs to be activated and configured before it can be used. Or in other words an Intel vPro Platform needs to be provisioned before the remote management capabilities can be used.
The main use cases of Intel AMT are:
Remote Power Control: Start up the PC remotely.
Hardware KVM: Control remotely the PC (Keyboard, Video, Mouse) even when the OS is not present.
Remote Access: Recover faulty systems without sending a technician.
BIOS & OS Support: Boot the PC remotely in a temporary environment when the PC doesn´t start properly (to change BIOS configuration, to re-image a PC, …)
The Intel Management Engine is small processor part of the chipset of an Intel vPro PC. Intel AMT belongs to the firmware running on the ME. So when we talk about the AMT version, we actually mean the ME firmware version.
Intel Active Management Technology: Intel AMT provides all out-of-band remote management functionality (power control commands, Hardware KVM, Advanced Boot Options (e.g., Boot to BIOS, Boot to PXE, etc.) A PC containing Intel AMT is an Intel vPro Enterprise PC
Intel Standard Manageability: Intel ISM is a subset of Intel AMT. Hardware KVM functionality is currently the most important functionality that is missing with Intel ISM. You can still access and change the BIOS remotely with ISM using a text-based interface. Other missing features are Intel Remote Platform Erase & Intel One-Click Recovery. (Both Intel AMT features are however not implemented by most OEMs (yet), as it requires BIOS adaptations)
When we want to talking about User Consent required or not for certain Intel AMT functionality, we need first to talk about the different provisioning methods. Provisioning is the process of activating and configuring Intel AMT on devices so they can be remotely managed with MAP. The provisioning method determines how Intel AMT is activated and configured on your devices. Different methods offer varying levels of security, automation, and complexity.
There are 2 provisioning methods, Host Based Provisioning and Certificate Provisioning.
Host-Based Provisioning (HBP): The simplest and default provisioning method. A vPro PC is provisioned in client control mode. User Consent is enforced for Intel AMT functionalities such as Intel AMT Hardware KVM and Advanced Boot Options. (e.g., Boot to BIOS, Boot to PXE, etc.)
Certificate Provisioning (TLS-PKI): A vPro PC is provisioned in admin control mode. User consent can be configured for Intel AMT functionalities such as Intel AMT Hardware KVM and Advanced Boot Options (e.g., Boot to BIOS, Boot to PXE, etc.)
For successful provisioning with Certificate Provisioning, certain conditions on the network or vPro PC need to be fulfilled.
This option is only available if an Intel AMT Provisioning Certificate is uploaded to the tenant.
Intel® Endpoint Management Assistant (Intel® EMA) provided the capability to manage vPro PCs:
Inside or outside (working in the office or from home)
Wired or Wireless (Wi-Fi) connectivity.
Healthy OS or inoperable/damaged OS causing the PC not to start. Unique value: other management tools are only able to connect to a PC when the OS is up and running.
Intel EMA
Provides the functionality to provision Intel vPro PCs and to use the Intel AMT functionality
Provides in-band functionality (remote desktop,…) for vPro and non-vPro devices
Provides out-of-band functionality (Intel AMT functionality) for Intel vPro PCs
Intel EMA consists of a server that needs to be installed and configured and an agent that needs to be installed on each managed device.
Intel EMA consists of a server that needs to be installed and configured and an agent that needs to be installed on each managed device.
Intel Core Processor Generation
ME Firmware Version
Minimal ME Firmware Version
Recommended ME Firmware Version
Comments
6
11
11.8.79.x
11.8.96
Officially not supported and validated anymore
7
11
11.8.79.x
11.8.96
Officially not supported and validated anymore
8
12
12.0.70.1607
12.0.95
9
12
12.0.70.1607
12.0.95
10
14
14.0.45.1341
14.1.74
11
15
15.x.y.z
15.0.49
12
16
16.x.y.z
16.1.35
13
16
16.1.y.z
16.1.35
14
16
16.1.y.z
16.1.35
Core Ultra (Series 1)
18
18.x.y.z
18.0.10
Core Ultra (Series 2)
20
20.x.y.z
Intel AMT cannot get activated and configured by the Intel EMA Agent when the ME firmware version is 10 or earlier. The first number of the ME Firmware Version is linked to the Intel Core Processor or Intel Core Ultra Processor Generation. In other words a ME Firmware update will never change the first number of the ME Firmware version
MAP is a comprehensive solution designed to simplify the activation, management, and maintenance of devices with Intel® vPro™ technology. MAP specializes in simplifying and accelerating the deployment of Intel vPro®, offering expert guidance and tools to make the process smooth and hassle-free. By partnering with MAP, businesses can fully leverage Intel vPro’s capabilities without the typical headaches associated with setting up advanced technology platforms MAP is a cloud-base software platform designed to provision and manage Intel vPro PCs. MAP has two main components: The MAP platform and the Intel Endpoint Management Assistant (Intel EMA) server, configured as SaaS and running in the Microsoft Azure cloud. The MAP platform is where end customers register for access, complete the fleet test and manage their licenses. From the MAP platform customer can access their secured tenant on the Intel EMA server. On the Intel EMA server a customer can access all of the functionality to manage their remote PC fleet. MAP key features are designed to streamline IT support and enhance remote management. With MAP, IT support can resolve issues on remote vPro PCs without the need for physical office visits, even when PCs fail to start. The platform facilitates proactive management by ensuring systems remain updated, patched, and current, even in unattended environments. Additionally, MAP enables reactive troubleshooting by granting remote access to the BIOS and facilitating troubleshooting in the event of an attack, even when the operating system is inaccessible.
When it comes to use the remote management capabilities of Intel vPro, businesses have two main paths: managing the process in-house or leveraging platforms such as Managed Activation Platform (MAP)
One of the standout benefits of MAP, compared with a DIY approach, is the quick turnaround for managing your PC fleet. While setting up an in-house activation project can take anywhere from 3 to 9 months, MAP can have your endpoints operational in just a few hours—or a few days for more complex networks. This rapid deployment means less downtime and faster productivity gains.
In-house solutions often come with higher costs. The expenses can quickly escalate:
Time & expertise required for setting up your own Intel EMA server.
Time & expertise required for provisioning Intel vPro PCs.
Database licenses.
In-house datacenter costs or cloud related costs.
With MAP, these upfront costs vanish. There are no need for additional Windows OS servers, Azure licenses, or in-house resources.
MAP cuts vPro deployment time from months to days, eliminates server costs, and reduces TCO through less downtime and fewer site visits. It offers cost-effectiveness, simple deployment, and remote access to unbootable PCs.
You only need to register, follow the onboarding process to validate your device fleet’s compatibility, and configure Intel® AMT to begin managing devices remotely
For organizations with specific or complex needs or specific infrastructure requirements, a custom MAP solution is often the best route. Scenarios could involve setting up a dedicated MAP Intel EMA server in the cloud or within the company’s own network. The configuration of the MAP Intel EMA Server can be tailored to fit specific complexities and requirements or other bespoke deployments.
For more information on the custom MAP solutions, send an email to sales@mappcmanager.com
MAP uses a multitenancy architecture, meaning that MAP customers are using the same Intel EMA server. Even though customers are using the same MAP Intel EMA server, they are not aware of each other, and each customer's data is kept completely separate. Each customer is given access to a tenant created specifically for them. Each tenant's data is isolated and remains invisible to other customers.
To understand multitenancy, think of how banking works. Multiple people can store their money in the same bank, but their assets are completely separate, even though they are kept in the same place. Customers of the bank do not interact with each other, do not have access to other customers' money, and are not even aware of each other.
MAP starts with a secure foundation of the Azure Cloud Security. MAP takes advantage of multi-layered security provided by Microsoft across physical datacenters, infrastructure, and operations in Azure.
Within MAP, security is integrated at various levels to safeguard our assets and ensure the integrity, confidentiality, and availability of our systems and data.
MAP uses a multitenancy architecture, meaning that MAP customers are using the same MAP Intel EMA server. Even though customers are sharing the same MAP Intel EMA server, customers are not aware of each other, and each customers data is kept totally separate. Every customer gets access to a tenant that is created for them. The data in the tenant's is isolated and remains invisible to other customers.
For detailed information about security, you can read the MAP Architecture & Security Overview.
MAP Platform stores the personal and company information provided during the onboarding.
MAP Intel® EMA server collects only device-related information (e.g., PC device manufacturer, CPU model, OS version) for management purposes and does not collect or use personal data.